Saturday, October 26, 2013

WPF - Part: 1

This is Part: 1 of the overview WPF Tutorial. 
I will tackle specific WPF concepts separately in future posts.

    WPF is a powerful framework for building windows applications, however there is a steep curve in learning. The whole WPF framework only makes sense when all the individual pieces of the framework fall in together. In other words, one must understand the entire WPF framework in order to understand any of it.

1. How Windows Forms differ from WPF?


    Windows forms are simply wrappers around USER 32 and GDI 32 APIs - which provide the traditional Windows look and feel and drawing support for rendering shapes, text, images, etc. respectively.

WPF doesn't use GDI 32 rendering API at all, it's part of .NET and a mixture of managed and unmanaged code and it's only available from .NET - i.e. no public, unmanaged API calls allowed.


2. What's in it for me?

    Today's hardware and graphics cards in particular offer a lot of computing power, it's not unheard of having gigabytes of memory purely on the graphics cards. If fact today's graphics cards have more processing power than windows machines did 25 years ago, back when user.exe (16bit dll - and yes it had .exe extension) and later 32-bit backwards compatible USER 32 were designed. Also, remember that GDI and USER subsystems were introduced with Windows 1.0 in 1985. 
The USER 32 and GDI 32 subsystems weren't designed for the new powerful graphics cards, so most of the power sits unused.

How do we take advantage of new graphics cards that offer 3D accelaration? 

One way is to write open GL or Direct X code, but that of course does not easily intergrate with user interface application, drop down boxes, data binding, etc. Using (or so I've heard) Direct X API to create windows business applications isn't for the faint of heart. That's where WPF comes in. WPF uses Direct X API,  so all WPF drawing is performed through Direct X, which allows it to take advantage of the latest in modern video cards.
   
    There's also an issue with resolution, classic style of constructing user interfaces has issues on modern PCs because windows applications are bound by certain assumptions about screen resolution and that makes traditional applications unscalable. Windows applications render small on very high resolution monitors because they cram pixels more densely. 
WPF does not have this problem, because it uses system DPI setting and renders all elements on the screen by itself, so a button that's 1 inch long on low resolution monitor will remain 1 inch long on a high resolution monitor. In other words, all elements on the screen are measured using device-independent units.

   Of course it is possible to write an application (without using WPF) that scales up or down itself and adapts to different screen resolutions (pixel size of the display), however most displays or monitors in the past had roughly the same pixel size, so of course nobody bothered to do that. Luckily for us WPF applications are DPI aware and hence scalable by default, nothing special needs to be done on your part. 

3. Let's get our hands dirty and do some XAML WPF test (without actually writing any real code)

Note: It may surprise you but WPF doesn't need XAML and XAML doesn't need WPF.
Althought most of WPF is written using XAML.


Back in the day Microsoft used to bundle XamlPad with Visual Studio 2008, but it has been discontinued. You can still get it if you have MSDN Subscription but since not everyone reading this has one I found an alternative solution: Kaxaml.
It essentially lets you enter XAML and see what it will look like.

Enter the code below, if fact all you need to enter is the text in bold:

 <Page  
  xmlns="http://schemas.microsoft.com/winfx/2006/xaml/presentation"  
  xmlns:x="http://schemas.microsoft.com/winfx/2006/xaml">  
  <Grid>  
   <Button Content="OK" Width="85" Height="25"/>  
  </Grid>  
 </Page>  


Now, if you zoom in, you can see that the button does not get pixelated.


Composibility - it's the power of WPF. We can compose all the different styles of content that WPF supports inside the button, so let's take this basic button control and...

a. Add layout:


 <Page xmlns="http://schemas.microsoft.com/winfx/2006/xaml/presentation" 
       xmlns:x="http://schemas.microsoft.com/winfx/2006/xaml">   
  <Grid>  
    <Button Width="85" Height="25" >    
      <StackPanel>    
       <TextBlock Text="OK"/>    
      </StackPanel>   
    </Button>   
  </Grid>  
 </Page>  
WPF supports something called: a content model

Button in WPF lets you add only one child, just so it doesn't have to be in charge of how all the other children are laid out, here I've used <StackPanel> so I can add more children later.

2. Format text:
 <Page xmlns="http://schemas.microsoft.com/winfx/2006/xaml/presentation"
       xmlns:x="http://schemas.microsoft.com/winfx/2006/xaml">  
  <Grid>  
    <Button HorizontalAlignment="Center" VerticalAlignment="Center">    
      <StackPanel>   
       <TextBlock FontSize="30"> WPF <Italic>Rulez</Italic> </TextBlock>     
      </StackPanel>     
     </Button>    
  </Grid>  
 </Page>  

Notice that I've added HorizontalAlignment and VerticalAlignment so that the button will size itself according to the content.

3. and some graphics:
 <Page xmlns="http://schemas.microsoft.com/winfx/2006/xaml/presentation"  
       xmlns:x="http://schemas.microsoft.com/winfx/2006/xaml">  
  <Grid>  
    <Button HorizontalAlignment="Center" VerticalAlignment="Center">   
     <StackPanel>     
       <TextBlock FontSize="30"> WPF <Italic>Rulez</Italic></TextBlock>    
        <Ellipse Fill="Red" Width="33.143" Height="33.143"/>   
        <Ellipse Fill="Blue" Width="33.143" Height="33.143"/>   
     </StackPanel>  
    </Button>   
  </Grid>  
 </Page>  

Not very exciting graphics but the point to illustrate was composability of WPF.

As I've mentioned at the beginning, WPF does not necessarily need XAML, so how would
something like this?
<Button x:name="submitButton" FontSize="30" FontFamily="Arial'>_Submit</Button>
be written without XAML? Here's how:
Button button = new Button();button.FontSize=30;button.FontFamily=new FontFamily("Arial");button.Content = "_Submit";
That's it for the first.


Sunday, October 6, 2013

ASP.NET MVC

As a recent convert from fat client applications (MFC (C++), Windows Forms, WPF) to ASP.NET and ASP.NET MVC, I've created a simple project and implemented it twice using both of these two technologies. First in ASP.NET and second in ASP.NET MVC.

Here you can download the sample solution file that includes both the ASP.NET and ASP.NET MVC projects. It was written using Visual Studio 2012 and .NET Framework 4.5
Latest code for this solution from codeplex:

Let's start with ASP.NET and create a Web Forms application to post and record blog posts.

1. First we'll start with creating an ASP.NET WebForms application
   a. Create an empty application.
 
   Go to File -> New -> Project and select ASP.NET Empty Web Application:


 2. Add new Web Form:
    a. Right click on the project
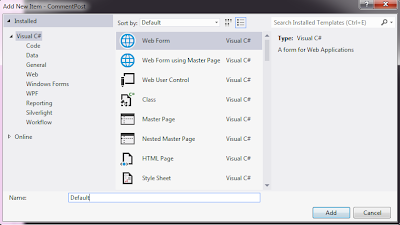
       Add New Item -> Web Form
       Type "Default.aspx" and click the OK button:


    b. Right-click on the Default.aspx entry in the Solution Explorer and select Set as Start Page from the pop-up menu.

       
3. Add Data Model:
     a. Right click on the project
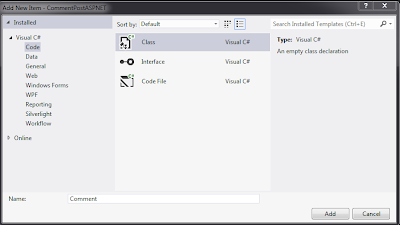
        Add New Item -> Class
        Type: Comment.cs


Copy/Paste the following lines into the Comment model object:

 using System.ComponentModel.DataAnnotations;  
 namespace CommentPost  
 {  
   public class Comment  {  
     [Required]  
     public string PosterName { get; set; }  
     [Required]  
     public string PosterEmail { get; set; }  
     [Required(ErrorMessage = "Did you like or didn't like my post?")]  
     public bool? LikedPost { get; set; }  
   }  
 }  

I'm jumping ahead and adding Model Validation here. The [Required] Attribute simply specifies that a data field value is required.

       
4. Add a Collection object - we need to have some sort of storage, since we don't have any database backing:

     a. Right click on the Project:

        Right click and select Add New Item -> Class


 Copy/Paste the following lines into the CommentsCollection object:
 using System.Collections.Generic;  
 namespace CommentPost  
 {  
   public class CommentsCollection  
   {  
     private static readonly CommentsCollection Collection = new CommentsCollection();    private readonly List<Comment> _comments = new List<Comment>();  
     public void AddResponse(Comment response)  
     {  
       _comments.Add(response);  
     }  
     public static CommentsCollection GetCommentsCollection()  
     {  
       return Collection;  
     }  
     public IEnumerable<Comment> GetAllComments()  
     {  
       return _comments;  
     }  
   }  
 }  

5. Now we are going to create a simple form in Default.aspx page
 
Copy/Paste the following lines into your Default.aspx page:
 <%@ Page Language="C#" AutoEventWireup="true" CodeBehind="Default.aspx.cs" Inherits="CommentPost.Default" %>  
 <!DOCTYPE html>  
 <html xmlns="http://www.w3.org/1999/xhtml"><head runat="server">  <title>My Blog</title>  
   <link rel="stylesheet" href="StyleSheet1.css" /></head><body>  <form id="form1" runat="server">    <div>  
       <h1>Welcome to my blog!  
       </h1>  
       <p>  
         Please leave a very positive comment.  
       </p>  
     </div>  
     <div>  
       <asp:ValidationSummary ID="validationSummary" runat="server" ShowModelStateErrors="True"/>      <label>Name: </label>  
       <input type="text" id="PosterName" runat="server" />    </div>  
     <div>  
       <label>Email: </label>  
       <input type="text" id="PosterEmail" runat="server" /></div>    <div>  
       <label>Liked the post?: </label>  
       <select id="LikedPost" runat="server"><option value="">Liked it?</option>  
         <option value="true">Me Likey!</option>  
         <option value="false">Me NO Likey!</option>  
       </select>  
     </div>  
     <div><button type="submit">OK</button></div>  
   </form>  
 </body></html>   

Notice that I've already included support to display validation errors:
  <asp:ValidationSummary ID="validationSummary" runat="server" ShowModelStateErrors="True"/>  

6. Handle the Form Post when the 'OK' button is pressed:

ASP.NET 4.5 has a built in Web Forms binding. It is a Ad-Hoc Model Biding where you can bind to controls without using data bound controls such as formview.
We need to grab values from the browser request and populate properties in our data model through process called: model binding, for this purpose we'll use Page.TryUpdateModel method.

a. Double click on Default.aspx.cs file

Copy/Paste the following lines into your Default.aspx.cs page:

 using System;  
 using System.Web.ModelBinding;  
 namespace CommentPost  
 {  
   public partial class Default : System.Web.UI.Page  {  
     protected void Page_Load(object sender, EventArgs e)  
     {  
       if (!IsPostBack) return;  
       Comment comment = new Comment();  
       if (!TryUpdateModel(comment, new FormValueProvider(ModelBindingExecutionContext))) return;  
       CommentsCollection.GetCommentsCollection().AddResponse(comment);  
       if (comment.LikedPost.HasValue && comment.LikedPost.Value)  
       {  
         Response.Redirect("thanksforlikingit.html");  
       }  
       else      {  
         Response.Redirect("ohwell.html");  
       }  
     }  
   }  
 }  


Notice that I've added runat="server" to the HTML elements. If I didn't the biding process would not work.

7. Create two response pages:
   a. thanksforlikingit.html
 
   Right click on the project and select new item -> HTML page
   Type: thanksforlikingit.html and Click 'Add' button

   b. ohwell.html
    Perform the same steps as above but type ohwell.html instead.
 
   c. Double click on  thanksforlikingit.html file and type

 using System;  
 using System.Web.ModelBinding;  
 namespace CommentPost  
 {  
   public partial class Default : System.Web.UI.Page  {  
     protected void Page_Load(object sender, EventArgs e)  
     {  
       if (!IsPostBack) return;  
       Comment comment = new Comment();  
       if (!TryUpdateModel(comment, new FormValueProvider(ModelBindingExecutionContext))) return;  
       CommentsCollection.GetCommentsCollection().AddResponse(comment);  
       if (comment.LikedPost.HasValue && comment.LikedPost.Value)  
       {  
         Response.Redirect("thanksforlikingit.html");  
       }  
       else      {  
         Response.Redirect("ohwell.html");  
       }  
     }  
   }  
 }  
}
   d. Double click on ohwell.html file and type:
  <!DOCTYPE html>  
  <html xmlns="http://www.w3.org/1999/xhtml">  
  <head>  
    <title>My Blog - sorry you did not like it!</title>  
  </head>  
  <body>  
    <h1>Thanks!</h1>  
    <p>Please write me with your comments and suggestions on how to improve.</p>  
  </body>  
  </html>  

8. Optionally apply some basic CSS:
a. Add style sheets:
 Right Click the project in the solution and select "StyleSheet"


 Copy paste CSS:
 #form1 label { border-radius:6px; width: 120px; display: inline-block;}  
   #form1 input { border-radius:6px; margin: 4px; margin-left: 6px; width: 150px;}  
   #form1 select { border-radius:6px; margin: 4px; width: 150px;}  
   button[type=submit] {border-radius:6px; font:2.4em Futura, 'Century Gothic', AppleGothic, sans-serif; font-size:100%; cursor:pointer; margin-top: 20px;}  

*****************************************************
ASP.NET MVC

MVC stands for Model-View-Controller where
M - is a Model(s) - > that represent the data of the application and logic.
V - is View(s) - > these managed display of the information
C - controller (usually) interprets the mouse and keyboard inputs from the user, except in ASP.NET MVC it acts as a handler for incoming browser requests and retrieves model data.

We are going to add ASP.NET MVC to the same solution 
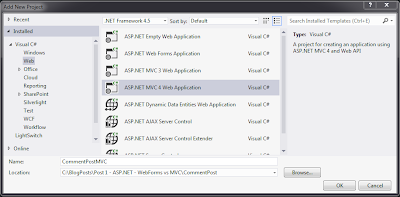
1. Right click on the solution file and choose new project then Web->ASP.NET MVC 4 Web application


Hit OK

(Don't forget to set CommentPostMVC project as the startup project)

Choose Empty for project template and Razor View Engine.

2. Adding controller
We need to add controller to our MVC application:
Right click on the controllers and choose Add -> Controller
Name the controller: CommentController

MVC parses path in the following manner:
 url: "{controller}/{action}/{id}"


 Now since we've named our controller CommentController we have to modify our default routing. Head over to to App_Start folder and open RouteConfig.cs file. Change controller to controller = 'Comment"

  routes.MapRoute(
                name: "Default",
                url: "{controller}/{action}/{id}",
                defaults: new { controller = "Comment", action = "Index", id = UrlParameter.Optional }
            );


   3. Adding View
   Right click on the Views folder in the project area - type 'Index' for the view name and uncheck 'Use a layout or master page:' and click Add button.


Controllers pass data to the view, which is responsible for rendering it to HTML.
 
   4. Adding Model
   Right click on the Models, add -> class and name is Comments - just like we did for web forms ASP.NET - non mvc


   Copy/paste the following lines into Models: (hint: it's same as ASP.NET NON MVC)
 
using System.ComponentModel.DataAnnotations;

namespace CommentPostMVC.Models
{
    public class Comment
    {
        [Required]
        public string PosterName { get; set; }
        [Required]
        public string PosterEmail { get; set; }
        [Required(ErrorMessage = "Did you like or didn't like my post?")]
        public bool? LikedPost { get; set; }
    }
}

5. Add call to our leave comment on our page:

a. Add Html.ActionLink from index.cshtml page to BlogPostComments page:

Copy/paste the following lines into index.cshtml
@{
    Layout = null;
}
<!DOCTYPE html>
<html>
<head>
    <meta name="viewport" content="width=device-width" />
    <title>Index</title>
</head>
<body>
    <div>
     
        @Html.ActionLink("Leave blog post comment", "BlogPostComments")
     
    </div>
</body>
</html>


6. The second parameter in ActionLink is essentially an action that we need to implement back in our CommentController, so let's head back to CommentController.cs and add 
two new methods:

       [HttpGet]
        public ViewResult BlogPostComments()
        {
            return View();
        }
        [HttpPost]
        public ViewResult BlogPostComments(Comment comment)
        {
            return View("Comment", comment);
        }
     
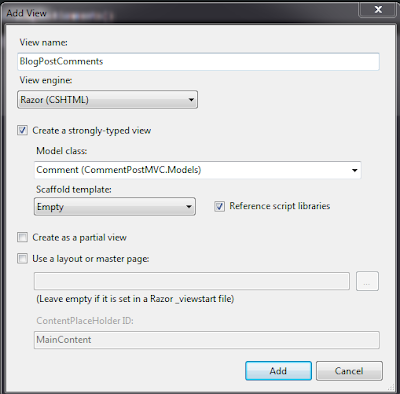
        Now, Right click either on the method itself (BlogPostComments or inside the method and add View.
        Check 'Create a strongly-typed view' and choose our previously created model Comment (CommentPostMVC.Models) from the drop down list.


  The method tagged with attribute [HttpGet] will handle our initial page load and the method tagged with [HttpPost] will handle our post back(s). It also tells MVC to render a view called Comment and pass in a comment model (object.)

     
7. Modify BlogPostComments.cshtml

Copy/Paste the following lines into BlogPostComments.cshtml
     
@model CommentPostMVC.Models.Comment
@{
    Layout = null;
}
<!DOCTYPE html>
<html>
<head>
    <meta name="viewport" content="width=device-width" />
    <title>BlogPostComments</title>
</head>
<body>
   @using (Html.BeginForm())
   {
        <p>Name: @Html.TextBoxFor(x => x.PosterName) </p>
        <p>Email: @Html.TextBoxFor(x => x.PosterEmail)</p>
     
       <p>Liked the post?:
           @Html.DropDownListFor(x => x.LikedPost, new[]
            {
                new SelectListItem {Text = "Me Likey!", Value = bool.TrueString},
                new SelectListItem {Text = "Me NO Likey", Value = bool.FalseString}
            }, "Liked it?")
        </p>
        <input type="submit" value="OK" />
    }
</body>
</html>
     
Notice: the Html.BeginForm() generates PostBack which will be handled by the method tagged with attribute [HttpPost] in our CommentController. 

 
  8. Add a second view (Comment View) for the action method:  ViewResult BlogPostComments(Comment comment)
  Right click inside that method add choose add view:
  Type: 'Comment' as a view name.
  Check 'create a strongly-typed view' and choose Comment (CommendPostMVC.Models) as a model from the drop down list.


copy/paste the following lines into the Comment.cshtml

@model CommentPostMVC.Models.Comment
@{
    Layout = null;
}
<!DOCTYPE html>
<html>
<head>
    <meta name="viewport" content="width=device-width" />
    <title>Comment</title>
</head>
<body>
    <div>
        <h1>Thank you, @Model.PosterName! with email: @Model.PosterEmail</h1>
        @if (Model.LikedPost.HasValue && Model.LikedPost.Value)
        {
            @:Thanks! and Please come again..
        }
        else
        {
           @:Please write me with your comments and suggestions on how to improve.
        }
    </div>
</body>
</html>


9. Validation
Now, that we've already have copy/pasted our old Comment model (from our asp.net comment.cs to MVC project comment.cs) mean that we are already including some have some very basic validation inside.

Go back to CommentController.cs and add check to validate the model:

        [HttpPost]
        public ViewResult BlogPostComments(Comment comment)
        {
            return ModelState.IsValid ? View("Comment", comment) : View();
        }

We, also need to display the errors back to the user, to do this we'll use:  @Html.ValidationSummary() which returns an unordered list (ul element) of validation messages that are in the System.Web.Mvc.ModelStateDictionary object.

That's all folks. You can download and/or browse the code here: codeplex